The semester is almost done. I am so very ready.
I've pretty much put all costume construction on hold as the mood just hadn't been there. I've got some linen and wool orders ready to place, for garb to build for Estrella War. Also sent my bowed psaltery for repairs so I can play it around a camp fire during Estrella.
Costume-wise, once I get the fabrics ordered, I've got tons to build. First up are some sideless gowns and the undergowns to go with them. I've got wool gabardine - not period but gorgeous shade of red, a more period woolen, cotton velveteen. Most are red, though I'll probably do an undergown in dark brown. Those are for me, naturally.
For Chris (14), I'm going to build 3-5 shirts - more fantasy pirate than period, but they are what he likes. I'm ordering linen in dark green and in natural. He really needs more than one shirt to get through an event and he does not seem to like the tunics.
We'll also both be getting some very warm, fairly period coats - wool lined in polar fleece because sometimes warmth is more important than total period accuracy! I'm also going to be building the canvas cover for my new, not-very-period yet not-mundane camping structure. It certainly won't be a pavilion, but it won't be a Coleman dome tent either. I'm using the old pipes and connectors from some of the carport shade structures that we've had in the past. Making do with what's available, which is a very period concept!
Lots to do in the next 8 weeks and I don't know if I can get it all done. I do love to over-load my to-do list! But it's always worth trying for it.
Tuesday, December 14, 2010
Wednesday, November 24, 2010
Oh, the agony, the agony....
Forced myself to go through my closet - ouch. At the moment I do pretty much have 2 complete wardrobes - wearable and too-small. I will not give up on myself, so I'm not willing to get rid of the too-small collection. It is motivation of a sort.
I did go through both sets of clothing, looking for anything that has not held up well through a few wearings and washings, anything that did not thrill me when looking at it. I asked myself, regardless of size, if I could wear it right this moment, would I want to? There were 3 kitchen garbage bags of things for which I could not answer yes. A few were things that I just did not enjoy wearing, even though I could right now. I probably could have removed another bag-full, but that was enough for one difficult day.
On a side note, how many skirts constitute too many? Mine are on those 4-5 skirt hangers, and I have at least a dozen of those hangers! Why do I love skirts so much? They really are my favorite type of garment!
So, a little space cleared. The walk-in closet back to being the main storage for all hanging, mundane clothes, wearable or not. The additional jury-rigged hanging space in the dressing area now usable for garb and the ugly, cheap garment rack returned to storage for use at camping events or (reluctantly) a garage sale. The garb had been in the sewing area, but that was getting unmanageable, and besides, I like finished work to get OUT of there!
Tomorrow's goal - yup, a goal for Thanksgiving day, since 1/2 the household went camping this afternoon...mine my way back into the studio - seriously. The entry is blocked! Once in, restore the mess I made before the last camping event and the last mad garb scramble, as well as the prep for the hat class last weekend. Once I can work again - back to building garb, and working on the new camping structure. Have poles - need cover. Lots of sewing and for the first time in a long, long time, I'm feeling motivated and excited about getting some things done. Yeah!
Monday, November 15, 2010
Back from Southern Crusades
And boy were the nights cold! Of course we knew to expect that going in, but still...I'm a wimpy city girl and it was cold! So today I'm coping with stuffy nose and ears, grungy throat and general sense of needing to have a quiet day, in my pj's with my coffee and some time to contemplate things that I saw at Southern and things that I want to get busy on, once I'm feeling better.
For Chris, 3-4 shirts just like the one that we bought back at Highlands War. He loves it so why not? Also a doublet or two in fabric, maybe one in leather. He needs boots, but I'm looking on line for those. Also a pouch to go on his belt, along side his arsenal! hehe
A pouch for me, as well as a hat or two. Saw a real beauty at one of the merchant's shops, but over $150 is way, way over my budget. And besides, supposedly, I know how to do this stuff...get busy me!
All of the things that I wanted to finish BEFORE Southern . . . the Viking caftan, the gray cloak, the reds and browns in the gowns and sideless surcoats.
Today I can just contemplate all of it from the cozy warmth of a blanket on a sofa.
Wednesday, November 10, 2010
In the Home Dec department....
Following up on the post about Vogue 2908, the bedroom decor pattern, here's my bedspread - almost finished and already in use!


I didn't want to get much of the room in the picture as it is a bit of a mess at the moment - and nothing unusual there. I can't wait until the rest of the new fabrics are sewn up and in place, with the walls painted Vanilla Delight. The room is going to be so fresh and opulent at the same time.
There will be lots of decorative pillows, miles of fringes - some beaded, some tasseled. Maybe I can have it done by Christmas and say Merry Christmas to me!
PICTURES!
Well, not here...they're on a blog page all their own. Look to the right of the screen for Projects and Camping My Way. I will take time to move them to appropriate posts later, but for now this was fast and easy! Explanations are included with the pictures.
Tuesday, November 9, 2010
WHERE ARE THE PICTURES???
Well, some are in the camera and some are waiting to get in....hehehe...
I will do pictures soon! Meanwhile though, I'm in garb and encampment land - and scrambling like crazy. With Southern Crusades coming up in just a couple more days, I'm trying to get a bit more versatility into my garb wardrobe. Estrella War is coming up in less than 3 months and these shorter events have been my motivation to get enough garb going to be able to do the whole week of Estrella...or so I hope.
Today though, was encampment improvement day, or so it seems. I made a maroon canvas/duck cover for the banquet table, and a brown canvas/duck cover for one of the very modern camping chairs. Those chairs are hard to get out of, so I made a matching cushion to give myself a little boost. I wanted to get something made to cover the First Up canopy, but need more time on that. Also used a coarse, uncomfortable, cheap cotton sheet to re-upholster an old but still solid Coleman sleeping bag. The inside flannel and batting were good, but the cover was shot. It looked like a heavy cotton voile - way too thin and light, and tore like crazy. The uncomfortable sheet is perfect on the outside and the bag has a new lease on life. Yes, it was a lot of work, but I think it was worth it. The bag was far too good to throw away. Mostly, I use it as a mattress topper, on top of my 5" thick, high density foam. Yup, I camp in comfort!
I'm seriously considering taking a real bed on this trip. It's very old, having been my grandmothers; she was born in 1894. It's a 3/4 bed, so no mattresses or sheets available except by custom-order. I used it as a guest bed for a couple years, but it's been in storage for many years. Now I'm thinking that, even though it's not in any way period, it is easy to break down and would get me up off of the ground. There'd be storage space underneath. If it doesn't work out for camping, then I need to look at having a carpenter take the pieces and make a bench or hall bench out of it...something that would keep the basic look of it, but perhaps with storage under a hinged lid. Really can't keep storing it any more.
So...I'll take lots of pictures in my encampment, as well as of everything else that I've mentioned in the last few posts...and get them up here SOON!
Sunday, October 31, 2010
On the costume-building front...
Snuck into JoAnn's today, wanting a piece from their very limited selection of 100% linens. Unfortunately, their selection of linens has shrunk drastically from where it was back in June. No luck there. Headed over to the suitings. What a mess. I wish that they would separate the 100% wools from all the rest. Almost missed some 100% wool gabardines - not perfect for costume purposes, but on sale for even more than the 40% off of the rest of the suitings - $10.00 per yard. A rich red and a soft brown should be useful for something, as should the red wool - non-gabardine and feels like a regular wool.
Still wish I could have gotten some linen though. My linen stash is so limited. Will have to shop online.
Still wish I could have gotten some linen though. My linen stash is so limited. Will have to shop online.
UFO Alert! They're in my sewing room!
If there is such a thing as anyone of you out there having a UFO-free sewing space, I DO NOT WANT TO KNOW ABOUT IT!
UFOs abound in my studio and I suspect that they always will. However, motivated by the coming of cooler weather and the desire to sleep under a bed cover that actually fits the bed, I pulled a UFO out this weekend and blasted through as much as I could, given the fact that weekends mean family at home! And of course there was the whole "let's see how late we can do costumes this year" thing.
Anyway, probably around 5 years ago, give-or-take, I found a pattern that gave me a really big AH-HAH moment. Vogue had developed a pattern, indeed an entire decorating scheme just for our master bedroom. It was 2908, and was already discontinued when I found it, but they had some in their discontinued stock and I got one of the last. The pattern contains everything a room could need in the way of textile decor. Several trips to SAS (local fabric store - manufacturer's overstocks, etc.) and I was able to come up with fabrics to fill in for every fabric in the picture on the pattern cover, which is here:

This picture isn't very good, but I'll replace it when I get a chance. Still, I think you can see the details well enough.
I have the floral for the spread, or something amazingly similar, a nice plaid - pink and tan on cream - for the bedskirt and tablecloth, a jacquard weave for the 26" french square pillows, and several other pieces for all of the other pillows and such. I have all the trims too, miles of fancy fringes, chunky pipings and more. And it's all been sitting in the studio, waiting quietly, waiting forever.
I had started the bedspread, to the point of having the top layer pieced. Of course, it took two attempts as the first time I cut too small for the kind of covering that I wanted. I was able to salvage that as the backing layer for the top layer. I also added a layer of polar fleece, pieced to the spread size, just to complicate things...I mean...to make it more quilt-like and warmer for our frigid AZ winters...yeah - right. It will be plenty warm anyway. It will also be large enough, the first time I've had a large enough cover for this bed since we got rid of the waterbed several years ago.
I was really so inspired by this pattern. Back when I first found it, I found a headboard at a local thrift store, awful pink and white thing, but several cans of spray paint turned it to a wonderful piece in dark, dark green. It doesn't have the scrollwork like the one in the picture, but it turned out pretty cool.
I'm still looking for tables like the small one in the corner next to the bed (nightstand position). They're not visible in this picture, but there is a slightly different view on the actual envelope. The tables are tall enough for the mattress, round with a lovely edge detail. Someday....
I wanted the crown mouldings and the crown moulding shelf, but for now the budget is saying no. I will have the creamy white walls, Vanilla Delight from Home Depot. In lieu of the crown molding shelf, I've just lucked onto 3 5'-long shelves, similar to the long crown molding shelf, but very light weight, probably a molded product, brand-new, in their wrappers, at the thrift store. They won't be quite the same as the elegant shelf in the picture, but I think they'll do just fine.
So eventually I'll have my version of the room in the picture - and a lot of left-over fabrics too! I'm thinking that there is enough of the floral for either pinch-pleated draperies in the place of the white sheers, or a summer-weight bedspread with a fringe finish. I already have the fringe...urgh.
The window toppers are cut as are the French square pillow pieces. If I can get the spread done this week, maybe the rest will follow.
P.S. Here's the back view of the pattern, in case anyone is curious.

It helps to put the bobbin in the machine....
Or, why was I making Halloween costumes 2 hours before trick-or-treating, especially given that the wearers are 13 and 15 (for a few more days/weeks) and really don't do the trick-or-treat thing anymore?
And yes, I tried to sew without the bobbin in the machine - can't really recommend it as a sewing technique....lol.
The old Scream robe was too short everywhere and too tight, too. Luckily, the stash yielded some costume-type faux suede, similar to the robe's original fabric. Added a 6" wide strip in each side seam, from robe hem to sleeve hem - plenty big and then some. Lengthened the sleeves 6" and the robe 11". That was perfect, as long as I didn't want to sew any hems. Good since I was short on time anyway.
Of course, both guys had been planning on wearing the Scream robe...but had forgotten to tell each other or me. It was 90 minutes too late for an emergency run to the neighborhood costume shop, so one kid got the robe and the other said, "I'll just go hang out at the party - no costume needed", follow about 15 minutes later by, "Could you make me a red shirt that says 'Thing One'?" Duhhhhhhhhhhhhh.....
But I'm a sucker...so, whip out a chunk of red cotton knit, free-hand cut a t-shirt, front and back identical except for the necklines, and a couple of sleeves. Well, the sleeves were ok, but the armholes were rather tight, which I figured out after I'd altered the sleeves to fit the armholes. It worked ok though. Just had to scramble to get 'Thing One' painted on the front, graffiti-style, and dried in time to wear. It hasn't exactly been heat-set, but it got worn!
So Halloween came and went, with costumes salvaged and created at the last possible moment...not how I intended to end the weekend, but what the heck...
Monday, October 25, 2010
Back from the weekend at Defenders...
It was a lovely weekend, nice weather, great people. The day-time temps were a little warm for multi-layered garb, but still not bad. The nights were wonderful for snuggling under a mountain of covers - oh how I've missed sleeping under covers.
I had been working on herringbone stitch embroidery on my dark blue apron dress. Once both sides were symmetrical, I called it wearable, but I am going to add some more stitching to it. The rust colored apron dress needs a bit of final assembly and some embellishment. I've ordered some tablet-woven pieces from an Etsy vendor. I think that one of those will be about right for the new apron dress. I may need to do a bit of embroidery on the peach gown - not sure yet.
I really need to focus on accessories for those two outfits. I started hemming the first of two veils - one oval, one rectangular. Both are of IL030 linen from Fabrics-store.com. At 2.8oz. it is their lightest linen, but I'm not thrilled with it. I guess I'm a little spoiled by the fineness of the silks that I've used. For a veil, this linen seems rather stiff, but hopefully it will soften with washing and time. I'm going to add beads to the edge of the oval, after it's hemmed. I'd like to do another one to be edged with the kumihimo-like trim that I'm making on my Diva Cord-maker. It's rather an imitation kumihimo gadget, but fun. I also need to finish a belt and make a bag to wear with those two outfits.
I've just figured out where the cameras are, so maybe tomorrow I can get some pictures taken and posted.
Going in another direction, I think that it's high time that I finish one of the two bedspreads that I started for my bedroom about 3 years ago, give or take. I just don't like working on humongous objects like bedspreads or wedding gowns, but I have a goal for my bedroom and if I don't get back to sewing, my room will never get done. More to post one of these days...
Wednesday, October 20, 2010
I did it again....
Yes, I let months go by.
Back in July, I was having such fun with the things that I hoped to have ready for Costume College, right up to the moment when I hit that mental brick wall. I think that it was partially a response to the bio-physical issues that tend to hit us all at some point in life, and partially frustration at the way some things just were not going right.
The hat project stalled when I finally had to face the fact that it was going to end up too small. A word of advice - if using a straw hat as a base for a turban or other style, make sure it is a little bit too big at the start. That way, when you wrap layers of fabric around the edge and decrease the size, it will still fit!
The stays for the white gown are on hold...maybe later this winter. Likewise the shoes to go with the white gown and the green gown.
What AM I working on? Well, when school started back up, things got quite busy and my studio and I saw little of each other. Even if I made it out there, I usually looked around and left. Sheesh. Right now though, in order to spark my interests and creativity, I'm indulging myself with things that have nothing to do with my teaching, things that I just WANT to do.
I started a 1514 chemise from a Tiziano Veccellio painting titled Woman with a Mirror. I first saw the chemise when someone posted a link to the picture on one of the costuming list-serves. They wanted help with interpreting the gown. I fell for the chemise. After waiting probably a little less than a year, I just couldn't wait any longer. I have the chemise assembled and am working on the 4 rows of 1/8" running stitches around the 150+" neckline. These stitches will pull up to form the lovely, very small, cartridge pleating around the very open neckline. It can be worn almost off-shoulder, with an almost straight-across neckline, or on-shoulder with a more scooped neckline. So far, I'm really liking how it is turning out and will post pictures, probably next week.
We're camping, SCA-style, this weekend and I'm rushing through a second Viking outfit. Gotta love Viking, even if it is debatable as to period accuracy and proper construction techniques. It's just so fast and easy and it looks good ON! I'm buzzing up a peach colored gown - probably not period, but I'm trying really hard to use things that I already have on hand. The apron gown is a 2-piece version - supposedly maybe more period-correct, with a wide back panel and a narrow front panel. It's in a rust-colored woolen and will go over the peach gown.
I took time to make myself a couple of strands of bead-work to wear on the apron gown, fastened to the brooches at the base of the straps in front. Again, made do with beads that I already had, but I think that they turned out pretty good.
I'm also making a Viking caftan-like coat. Period accuracy of this garment is also somewhat debated, but I like it. My fabric is seriously not period, or so I believe. It is wool, but it is a woven stripe in shades of soft brown/rust with some gold/yellow and black. I just like it so much that I don't care if it's not period! I'm going to line it in the same peach linen that I am using for the gown. Not trying to over-coordinate, but I have plenty of the peach and am happy not to be spending anything on fabric right now. I own enough!
I'm also trying to decide on a better, more period-looking camping arrangement. I'm tired of the old dome tent and want more room, more easily accessed. Debating lots of options right now and will post about it here when I actually have more of an idea of what I'm doing.
Photos will follow, hopefully quite soon, I promise!
Friday, July 16, 2010
Being sluggish...
Summer heat...kids home all the time...being a certain age...
I don't know what it is exactly, but something took my enthusiasm and attitude into a nosedive and I haven't been in the studio for several days. I had the time, I just didn't have the mood.
Could be back on track tomorrow...we'll see.
I don't know what it is exactly, but something took my enthusiasm and attitude into a nosedive and I haven't been in the studio for several days. I had the time, I just didn't have the mood.
Could be back on track tomorrow...we'll see.
Friday, July 9, 2010
Fixing a leftover problem from last year...
Figured I'd better deal with this now and not at the last minute. The white gown does not work over the stays. Both are from the Sense & Sensibility pattern as printed and published by Simplicity, though I did use the S&S directions from the original version of the pattern. These stays work fine with my green gown, which has a higher, gathered neckline. However, with this gown, the stays create a ridge all across the front of the bodice, right at the mid-way from the neckline to the high waistline.
I took a picture, but it's not quite as obvious here as it would be if the gown were actually buttoned. Unfortunately, I cannot button this one myself, but I think you can get the idea anyway.

I'm thinking of making up a second set of stays, using the gore pieces for one cup-size smaller. This would pull the top edge of the stays in towards the body, making it so that the edge would push less against the front of the bodice. Do I need the smaller cup-size? I'm not sure, but the experiment can't hurt anything.
I've also considered pulling the pattern for the bodiced petticoat, from the La Mode Bagatelle pattern for this period. I haven't done so yet, so don't know if it can be worn INSTEAD of stays, or needs to be worn with them. If it could replace stays, I think from looking at the sketches that it would fix this problem.
Any thoughts on this would be most welcome!
Wednesday, July 7, 2010
Turbans...
Ok, so not really turbans, more mock-turbans, but these things are fun. Here's what I've played with today.
I started with the crown. As you can see, at one time it was hot pink - a lovely strong pink with a wide brim, but time had not been kind to it. A lot of the pink is very faded and some of the straw is rather fragile. To stabilize the fragile areas, and to create a layer that could take stitches, I covered the crown with fusible, light-weight, weft-insertion interfacing. I liked the feel of it and thought that it might even help to smooth the ridges of the straw braid.


A very light touch of the iron was enough to secure the interfacing to the outside of the crown. After the excess was trimmed to an even width all around, I tucked it inside and again applied the tip of the iron very lightly to secure the interfacing to the inside of the straw. Where the interfacing had formed large tucks, I clipped out some of the excess, as I was afraid that the hat might become to small with so much bulk inside the crown.

The next step was to line the crown. The lining is just loosely pinned, then slip-stitched from the outside, through the allowance which was trimmed evenly after the stitching was finished.

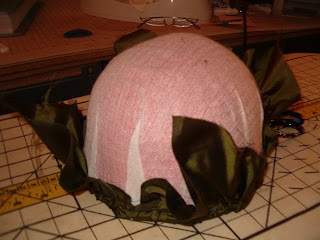
The outside of the crown is covered in the same fabric as the lining.

Here comes the fun. Once the crown was covered, it was time to experiment with the 'turban'. First I did a really fast wrap with the twisted fabrics still intact - a full yard of each piece - not great, but I was trying to get a feel for how these would work.


Following some ideas from some hat-making books, I cut bias strips of the two fabrics, each the circumference of the crown plus about 5-6 inches (32 inches) by a little more than twice the height of the crown - around 8 inches. These were stitched into long tubes, but with a twist of sorts. By folding them in half lengthwise, but then offsetting the raw edges along the length, I stitched in a ripple that will keep them from flattening out. These tubes were turned right-side out, then twisted together and wrapped around the crown.


My first thought was that, feathers or no, this seemed rather skimpy.
Next was to stuff the tubes with some 1" thick upholstery 'cord' - very thick, but very soft.


All of these have been very roughly wrapped and pinned, but still, this one didn't work for me either - maybe too much? Or maybe too perfectly defined by the cord.
Finally, I went back to the millinery books for a look at how they wrapped their turban-looks. I tried one more time and got this.


Then I added a scrap of the stripe to the back, simulating the long ties that some of the Regency turban styles had.

So now I'm getting somewhere, but somehow, none of these seem quite right.
Next try - cover the green crown with a piece of the stripe, then re-apply the twisted tubes.


 These are starting to look more interesting to me! I'm not sure about the feathers. I definitely like the crown covered in the strip to match one of the twists. I'm going to let it sit over-night. In the morning, I think I'll look at a few more Regency turban-type headdresses on-line before taking another look at what I've got going here.
Oh, side note - these pictures make it look as though my studio must be horribly dark. In reality, it's not. I have so many lights in that room. For the last couple of pictures, I put a muslin covered board behind the wig head, hoping that the reduced background clutter would be helpful. However, I am not much of a photographer and do not know why the photos come out so dark and yellow-ish. I'll keep working on it.
I started with the crown. As you can see, at one time it was hot pink - a lovely strong pink with a wide brim, but time had not been kind to it. A lot of the pink is very faded and some of the straw is rather fragile. To stabilize the fragile areas, and to create a layer that could take stitches, I covered the crown with fusible, light-weight, weft-insertion interfacing. I liked the feel of it and thought that it might even help to smooth the ridges of the straw braid.

A very light touch of the iron was enough to secure the interfacing to the outside of the crown. After the excess was trimmed to an even width all around, I tucked it inside and again applied the tip of the iron very lightly to secure the interfacing to the inside of the straw. Where the interfacing had formed large tucks, I clipped out some of the excess, as I was afraid that the hat might become to small with so much bulk inside the crown.

The next step was to line the crown. The lining is just loosely pinned, then slip-stitched from the outside, through the allowance which was trimmed evenly after the stitching was finished.


The outside of the crown is covered in the same fabric as the lining.

Here comes the fun. Once the crown was covered, it was time to experiment with the 'turban'. First I did a really fast wrap with the twisted fabrics still intact - a full yard of each piece - not great, but I was trying to get a feel for how these would work.


Following some ideas from some hat-making books, I cut bias strips of the two fabrics, each the circumference of the crown plus about 5-6 inches (32 inches) by a little more than twice the height of the crown - around 8 inches. These were stitched into long tubes, but with a twist of sorts. By folding them in half lengthwise, but then offsetting the raw edges along the length, I stitched in a ripple that will keep them from flattening out. These tubes were turned right-side out, then twisted together and wrapped around the crown.


My first thought was that, feathers or no, this seemed rather skimpy.
Next was to stuff the tubes with some 1" thick upholstery 'cord' - very thick, but very soft.


All of these have been very roughly wrapped and pinned, but still, this one didn't work for me either - maybe too much? Or maybe too perfectly defined by the cord.
Finally, I went back to the millinery books for a look at how they wrapped their turban-looks. I tried one more time and got this.


Then I added a scrap of the stripe to the back, simulating the long ties that some of the Regency turban styles had.

So now I'm getting somewhere, but somehow, none of these seem quite right.
Next try - cover the green crown with a piece of the stripe, then re-apply the twisted tubes.


 These are starting to look more interesting to me! I'm not sure about the feathers. I definitely like the crown covered in the strip to match one of the twists. I'm going to let it sit over-night. In the morning, I think I'll look at a few more Regency turban-type headdresses on-line before taking another look at what I've got going here.
Oh, side note - these pictures make it look as though my studio must be horribly dark. In reality, it's not. I have so many lights in that room. For the last couple of pictures, I put a muslin covered board behind the wig head, hoping that the reduced background clutter would be helpful. However, I am not much of a photographer and do not know why the photos come out so dark and yellow-ish. I'll keep working on it.
Tuesday, July 6, 2010
Fun
Ok, so all this fuss to get ready to go to CoCo is maybe really about something else, like giving me reasons to turn myself loose and just play.
I haven't even taken scissors to the fabric yet. It's so much fun just twisting and wrapping and pinning the whole chunks of fabric on to the re-cycled crown.
That's what I've done so far, twice. When I don't drape for a while, I forget how much I enjoy it. Here's playtime:
 These first three images were actually my second play attempt. I actually pinned the crown to the wig head, and twisted the cream and stripe fairly carefully. I opted to tuck in only 3 of the feather clusters.


The first attempt was much looser, more haphazard. Nothing was pinned at all. It was just quick and fun.


Tomorrow I'll get the scissors involved, drape and cut and baste and stitch.
Moving right along...or sideways!
Progress happens, mostly in bits and pieces. Then, along come more ideas, more goals to meet before CoCo.
Today things got very interesting. Even as I've been realizing that I have a lot more to do to get these gowns accessorized in time for CoCo, several other costumers have been making suggestions for getting my shoes ready, finishing the trim on the white gown, and maybe making a turban or two.
Below is the hem of the dress, hanging on the ironing board getting the rest of its trim pinned in place for hand-stitching.

This afternoon, at the suggestion of a couple other people, I spent time looking at Regency turbans. My hair does not lend itself to the curly do's of the Regency. Tracy has offered to help me with that, but I think having another option would be really nice.
I started by pulling some straw hats to disassemble for their crowns, which can be used as bases on which to build some longer-lasting head-dresses. The pink crown has had its edge bound to prevent fraying. I don't know what I'll do with the brims, but that's for after CoCo.

Once I had the crowns ready, I had to figure out fabrics. Funny, for all of the fabric that I have in my studio, there is really nothing appropriate in color, weight, fiber, or pattern for a Regency turban. I did find some feathers that could work, a couple of ostrich in a turquoise blue and a cluster of the skinny feather pieces from a peacock feather.

That still didn't solve the fabric question. The only thing that seemed sort of usable were the poly brocades from JoAnn's. They're just too heavy and stiff.
JoAnn's did have some actual silks, surprise, surpise - a bit expensive but available less than 2 miles from home. The green and the cream are dupioni from the apparel section, and the stripe is from home dec, also silk. Also below is the surprise I found in the floral section - a feather candle wreath. I don't know if it can be part of a turban, but my wire snips and I are going to find out.

I also found a couple of other colors of silk, a salmony shade and a blue, along with some cotton velveteen.

So what am I doing with all of this? I'm still figuring out Regency and all of it's variations. I'm thinking that the green, cream and striped silk, along with the feather wreath could be something to go with the green gown.
http://costumeraz.blogspot.com/2010/06/well-this-may-be-record.html
I'm looking at the cotton velveteen and a striped silk from Renaissance Fabrics - http://www.renaissancefabrics.net/cgi-bin/showAll.cgi?id=472&category=Silk%20Fabric&fabric=54
The green gown would be worn as a daytime gown, and so would need a simpler turban. The white gown would be evening, and I plan on wearing it for the Gala. That turban could be fancier. I'm looking for gloves too, and thinking about jewelry.
Sheesh . . . there's so much to do, so much to consider! If you think that I'm thinking my way in the wrong direction on any of this, please YELL!
Sunday, July 4, 2010
Learning new things!
Learned that Blogger blogs can have pages apart from the actual blog posts. Decided that might be a good place to put some old stuff from my old web site. Need to get rid of that old web site, but didn't want to lose the pages. Spent a lot of time building them.
So, across the top of this blog, or close to the top, are clickable links to the pages that I've added. I need to do a little more editing as the pages haven't turned out perfect. The links contained on these pages are old and some may not function correctly.
So, across the top of this blog, or close to the top, are clickable links to the pages that I've added. I need to do a little more editing as the pages haven't turned out perfect. The links contained on these pages are old and some may not function correctly.
Thursday, July 1, 2010
Progress in bits and pieces....
... but I'll take it!
I'm off to shop for Modpodge, silicone sealant, leather dye and various other goodies to use in my efforts to make modern footwear suitable for period, and to make hand-made, period footwear durable and esthetically pleasing. Isn't it amazing, the things that one gets one's self into as an aside to the main goal? I just want to wear my gowns!
I'm off to shop for Modpodge, silicone sealant, leather dye and various other goodies to use in my efforts to make modern footwear suitable for period, and to make hand-made, period footwear durable and esthetically pleasing. Isn't it amazing, the things that one gets one's self into as an aside to the main goal? I just want to wear my gowns!
Monday, June 28, 2010
Well, this may be a record...two posts in less than a week!
I'm getting ready for Costume College - or trying to anyway. In addition to getting stuff ready for those fun classes that I'm taking, I figure I'd better get my accessories ready NOW!

Then there's the issue of shoes. I looked a lot last summer and bought some, but never wore any of them. They all need a little something to make them a reasonable substitute for period footwear.
The first pair, a jazz dance boot, came in white and black so I have two pairs. I did not figure out what to do with them last summer, but really need to get them wearable this year!

This next pair, is a flat, but very shiny.


Then we have the stripes, cut-outs and partly-metallic gold. Any hope of making any of these period substitutes? Sheesh...well, maybe with fabric paints? Black magic?


Right now, I'm at least partly stumped, maybe even totally. I'm wide open to suggestions though, so fire away!
This last pair has nothing to do with the others, nor with Costume College and anything else that I might wear there. I just found these on etsy.com and thought they looked like a nice option for SCA events, sort of period-looking and pretty comfy. Ok, so the zipper up the back is not period, but other than that, these are cute and I know that they will see plenty of wear.

I'm getting ready for Costume College - or trying to anyway. In addition to getting stuff ready for those fun classes that I'm taking, I figure I'd better get my accessories ready NOW!
Here's the first of the pieces that I made for last year. I cut it from the Simplicity version of the Sense & Sensibility pattern, using the S & S instructions to try to make it a little nicer than what the Simplicity pattern instructions would have produced. I made the stays from the same pattern. For this dress the stays worked ok. Now I need to figure out the shoes and whatever else it's going to take to complete this outfit. Hair will be the biggest challenge I suspect.

This is the second gown from the same pattern, but with the lower neckline, no drawstring. The blue band is just bias-cut cotton and is only pinned in place, not stitched yet. The stays for the green dress did not work at all for this one. I need to either make another pair from the same pattern, altered slightly, or try another pattern for stays. Again, accessories and hair remain to be determined.

This is the second gown from the same pattern, but with the lower neckline, no drawstring. The blue band is just bias-cut cotton and is only pinned in place, not stitched yet. The stays for the green dress did not work at all for this one. I need to either make another pair from the same pattern, altered slightly, or try another pattern for stays. Again, accessories and hair remain to be determined.

Then there's the issue of shoes. I looked a lot last summer and bought some, but never wore any of them. They all need a little something to make them a reasonable substitute for period footwear.
The first pair, a jazz dance boot, came in white and black so I have two pairs. I did not figure out what to do with them last summer, but really need to get them wearable this year!

This next pair, is a flat, but very shiny.


Then we have the stripes, cut-outs and partly-metallic gold. Any hope of making any of these period substitutes? Sheesh...well, maybe with fabric paints? Black magic?


Right now, I'm at least partly stumped, maybe even totally. I'm wide open to suggestions though, so fire away!
This last pair has nothing to do with the others, nor with Costume College and anything else that I might wear there. I just found these on etsy.com and thought they looked like a nice option for SCA events, sort of period-looking and pretty comfy. Ok, so the zipper up the back is not period, but other than that, these are cute and I know that they will see plenty of wear.

Subscribe to:
Posts (Atom)