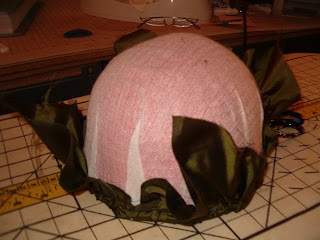
I started with the crown. As you can see, at one time it was hot pink - a lovely strong pink with a wide brim, but time had not been kind to it. A lot of the pink is very faded and some of the straw is rather fragile. To stabilize the fragile areas, and to create a layer that could take stitches, I covered the crown with fusible, light-weight, weft-insertion interfacing. I liked the feel of it and thought that it might even help to smooth the ridges of the straw braid.


A very light touch of the iron was enough to secure the interfacing to the outside of the crown. After the excess was trimmed to an even width all around, I tucked it inside and again applied the tip of the iron very lightly to secure the interfacing to the inside of the straw. Where the interfacing had formed large tucks, I clipped out some of the excess, as I was afraid that the hat might become to small with so much bulk inside the crown.

The next step was to line the crown. The lining is just loosely pinned, then slip-stitched from the outside, through the allowance which was trimmed evenly after the stitching was finished.


The outside of the crown is covered in the same fabric as the lining.

Here comes the fun. Once the crown was covered, it was time to experiment with the 'turban'. First I did a really fast wrap with the twisted fabrics still intact - a full yard of each piece - not great, but I was trying to get a feel for how these would work.


Following some ideas from some hat-making books, I cut bias strips of the two fabrics, each the circumference of the crown plus about 5-6 inches (32 inches) by a little more than twice the height of the crown - around 8 inches. These were stitched into long tubes, but with a twist of sorts. By folding them in half lengthwise, but then offsetting the raw edges along the length, I stitched in a ripple that will keep them from flattening out. These tubes were turned right-side out, then twisted together and wrapped around the crown.


My first thought was that, feathers or no, this seemed rather skimpy.
Next was to stuff the tubes with some 1" thick upholstery 'cord' - very thick, but very soft.


All of these have been very roughly wrapped and pinned, but still, this one didn't work for me either - maybe too much? Or maybe too perfectly defined by the cord.
Finally, I went back to the millinery books for a look at how they wrapped their turban-looks. I tried one more time and got this.


Then I added a scrap of the stripe to the back, simulating the long ties that some of the Regency turban styles had.

So now I'm getting somewhere, but somehow, none of these seem quite right.
Next try - cover the green crown with a piece of the stripe, then re-apply the twisted tubes.


 These are starting to look more interesting to me! I'm not sure about the feathers. I definitely like the crown covered in the strip to match one of the twists. I'm going to let it sit over-night. In the morning, I think I'll look at a few more Regency turban-type headdresses on-line before taking another look at what I've got going here.
Oh, side note - these pictures make it look as though my studio must be horribly dark. In reality, it's not. I have so many lights in that room. For the last couple of pictures, I put a muslin covered board behind the wig head, hoping that the reduced background clutter would be helpful. However, I am not much of a photographer and do not know why the photos come out so dark and yellow-ish. I'll keep working on it.
P.S. The more that I work on that wig head, the more that I dislike the face on it. I need to cover it with fabric or something!
ReplyDeleteMaking these are half the fun! And good idea that you pin it on each time instead of just sewing it so you can move things around. I had to adjust mine numerous times before I was happy. I kept getting the "bald pate" on the top of mine.
ReplyDeleteI like your feather additions.
Val